Newbie Spellweaver
- Joined
- Dec 26, 2012
- Messages
- 57
- Reaction score
- 15
This guide will contain a lot of text. And some pictures. If i made a mistake please reply below and I will be sure to fix it. I am using Windows 7 with a custom theme so do not be alarmed. Be jealous.
Credits to:
roplys_ for making a awesome video guide, Basically this guide is just like his except his is a video with no sound (besides clicking) showing you what the steps are, and this guide I took the time to type them all out.
Justin Bieber for releasing EP8 files. Thanks bro.
Extornia for being a boss and releasing a repack (used in this guide and roplys_
and these people
x30unlimited
AkiSora
TmX
Keith
and any one else who contributed to the files
Installing / Configuring the server:
** Download Ep8 Databases backups here **
1. Install MSSQL 2008 R2 and follow this guide to configure it while installing! Be sure to install in Default Instance, not named. And used Mixed Authentication. That will be SA's password.
2. Open SQL Server 2008 R2 and log in using SQL Server Authentication with login SA and your password.
3. Expand Server Objects
4. Right click Backup Devices and select New Backup Device
5. Click the ... next to File and Navigate to Account.Bak in the folder you extracted the EP8 Database Backups too. Select Account.Bak.
6. Name the Device "Account" without the "s (For future reference all "s in this guide are to differentiate the thing you need it to be named from the text in the guide. So when you see "s never include them unless i say to.)
7. Do the same for Authentication, CabalCash, CabalGuild, cabalmanager, EventData, NetcafeBilling, and Server01. It should look like:

8. Now expand Databases then Right click it and select New Database.
9. Name it "Account" then hit ok
10. Right click the Account database you just created and select Tasks > Restore > Database.
11. Select the Bubble next to From Device then hit the ... In the drop down menu select Backup device then select account. Then hit okay.
12. Now in the table below the device on the original menu select the bubble next to the only item in the table That will be the Restore setting. Should look like this:
13. Now in the top left select Options
14. Under Restore options enable "Overwrite the existing database (WITH REPLACE)" then hit Ok.
15. Repeat steps 8-14 for Authentication, CabalCash, CabalGuild, cabalmanager, EventData, NetcafeBilling, and Server01 databases. Be sure you name them the correct names and restore from the associated devices. MAKE SURE YOU GO SLOW AND YOU WILL NOTICE WHEN YOU CLICK RESTORE DATABASE THE "TO DATABASE" MAY CHANGE AND YOU MAY HAVE TO CHANGE IT TO THE DATABASE YOU ARE ATTEMPTING TO RESTORE When you are done it should look like this:
16. Now in the Server Objects folder right click Linked Servers and select New Linked Server
17. Fill it out like this:
18. Select Server Options and change RPC and RPC Out to TRUE
19. Hit OK
Databases restored and set up
Setting up CentOS
** Download Oracle VirtualBox here and the CentOS 5.8 DvD Full here and install VirtualBox. Download POWERISO from here and install it.***
1. Open VirtualBox, Click New name it "CentOS", choose Linux as the Type and other linux as the version. Hit Next and choose 2048 as the RAM, hit next then choose Create a virtual drive now and hit Create. Select VDI from the new window that pops up and hit Next, then select fixed size and hit next, then choose 40.98 gbs then hit create.
2. Click your new CentOS Vbox you created and then hit settings, Click network and then select Bridged instead of NAT (ONLY if you have a router). Then hit OK
3. Open your computer, you should see a virtual disk drive. Right click that, navigate to PowerISO > hit Mount image and select the disk 1 of centos you downloaded.
4. Click start on the CentOS vbox, a pop up will ask which drive you want to load centos from. Select your Virtual Disk drive with Disc 1 of centos mounted see my pic:
5. Hit Start
6. Hit Enter to start installation. Next it will ask to test the disc, hit skip. Next the graphical interface of CentOS installation will load up. Once it does hit next. Choose English, hit next. Choose U.S. English, hit next. A pop up will pop up asking if you want to partition, hit yes. On the next screen choose "Remove linux partitions on selected drives and create default layout.", hit next. A popup will asking if you want to partition for 41gb. HIT YES! if you dont have a big enough HDD you shouldnt be hosting in the first place. On the next screen hit next. On the next screen choose the yellow dot closest to your region. This is for the timezone. Hit next. on the next screen it will ask you to set up a password, type something and hit next. Now scroll down and check the boxes for Server, and Server - GUI. Hit next. Now hit next to begin installation.
7. Next to the bottom right click the disc icons and click remove disc. Then hit Reboot.
8. CentOS will begin to open for the first time. Once loaded hit Forward, Change Firewall to Disabled. Hit Forward. A popup will pop up asking if you are sure. Hit yes. On the next screen hit forward. Hit Forward again. On the date and time tab make sure its correct and hit forward. On the Create User page fill out the boxes and hit forward. Hit forward twice then hit finish. Now log in with root and the password you created.
9. Click Applications > Accessories > Terminal then type in "ifconfig" and hit enter. You then should see a bunch of text pop up similar to if you typed in ipconfig in cmd. Write the inet addr: address down. Thats your CentOS IP. Now hit the Earth icon with a mouse on it to open the web browser. Navigate to google.com to see if your internet works.
10. Hit System > Shutdown. This will shut down the vbox centos. This is how you always want to power down, similiar to shutting your real pc down.
11. Now right click CentOS in Vbox and click Clone. Name it CentOS backup. That will back CentOS up incase you mess anything up so you dont have to go through the long process again. This cloneing process can take a long time. So once again make sure your PC doesnt turn off. Go workout, go do parkour, go make sweet love to your special someone, or your hand. And then return back to this guide!
Setting Up the Server
*** You will need PuTTy and WinSCP for this section. Google will find you those links. ***
1. Open CentOS and log in to root, open terminal from Accessories > Applications section.
2. Type in "ifconfig" copy the inet addr: ###.##.#.### down. Thats your centos ip.
3. Open WinSCP and type in your CentOS IP as the Host Name. Now enter "root" as the username and your CentOS root password in password and hit Save...
4. Now hit login on WinSCP. it will ask you to save it in the Cache. Click yes
5. On WinSCP click Options > Preferences. Now click Applications under Intergration tab. Browse to where you saved your PuTTy exe. I saved mine in ""C:\CABAL\winscp and putty\putty.exe"" Make sure the boxes that say "remember session password and pass it to putty" and "open TelNet sessions in putty for FTP sessions" are checked and hit okay. Now click the putty icon in WinSCP (its under the word Sessions at the top. Looks like your PuTTy.exes icon. A pop up will ask you are you sure. Hit Run. Now Hit yes on the next pop up then once its loaded type "yum update". It will begin to update CentOS and eventually ask you if you want to download a update. Hit Y then enter. Next it will ask if importing is okay. Hit Y then enter. It will begin to import stuff. Let it work its magic.
6. Several minutes later in WinSCP ensure on the right side you are in CentOS's root folder. On the left side navigate to where you extracted Ep8repack to. Mine is C:\CABAL\ep8repack\. highlight everything in you ep8repack folder and hit f5: copy a popup will pop up. Hit Copy.
7. Once step 6 is done open Putty again. now type "./cabal_install.sh" it will ask if you want to begin the installation. Hit Y then enter. It will ask are you sure hit Y then enter.
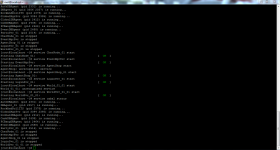
8. Now that the files are installed type "service cabal config". Open CMD and type in "ipconfig" and hit enter. At the top you should see a ip. Use that as the MSSQL server ip in Putty and hit enter. For the SQL user type sa and hit enter. Then put your MSSQL pass and hit enter. Now open up your internet. Google search what is my ip. You will see a IP. Put that in putty and hit enter. Now type in "service cabal start" on they all say OK then the server is started.
Some times services will stop. Just type "service NAME HERE start" example "service ChatNode_01 start" to start ChatNode_01 service.
Setting Up the Client
*** You will need a EP8 Client you can refer to this page and the Client patch here ***
1. Install the Ep8 Client you downloaded.
2. Extract the CabalClientPatch_DARKSTEELMAN.rar to your pc. Edit the internal file in the Data folder to your CentOS ip. You should know it already. If not open CentOS or in PuTTy type ifconfig. Use that. Save internal.
3. Copy the Data folder and the cabal_start.bat and paste it in your Cabal ep8 client folder.
4. Use the start cabal bat to load your client.
Reserved for Error Fixes
Credits to:
roplys_ for making a awesome video guide, Basically this guide is just like his except his is a video with no sound (besides clicking) showing you what the steps are, and this guide I took the time to type them all out.
Justin Bieber for releasing EP8 files. Thanks bro.
Extornia for being a boss and releasing a repack (used in this guide and roplys_
and these people
x30unlimited
AkiSora
TmX
Keith
and any one else who contributed to the files
Installing / Configuring the server:
** Download Ep8 Databases backups here **
1. Install MSSQL 2008 R2 and follow this guide to configure it while installing! Be sure to install in Default Instance, not named. And used Mixed Authentication. That will be SA's password.
2. Open SQL Server 2008 R2 and log in using SQL Server Authentication with login SA and your password.
3. Expand Server Objects
4. Right click Backup Devices and select New Backup Device
5. Click the ... next to File and Navigate to Account.Bak in the folder you extracted the EP8 Database Backups too. Select Account.Bak.
6. Name the Device "Account" without the "s (For future reference all "s in this guide are to differentiate the thing you need it to be named from the text in the guide. So when you see "s never include them unless i say to.)
7. Do the same for Authentication, CabalCash, CabalGuild, cabalmanager, EventData, NetcafeBilling, and Server01. It should look like:

8. Now expand Databases then Right click it and select New Database.
9. Name it "Account" then hit ok
10. Right click the Account database you just created and select Tasks > Restore > Database.
11. Select the Bubble next to From Device then hit the ... In the drop down menu select Backup device then select account. Then hit okay.
12. Now in the table below the device on the original menu select the bubble next to the only item in the table That will be the Restore setting. Should look like this:

13. Now in the top left select Options
14. Under Restore options enable "Overwrite the existing database (WITH REPLACE)" then hit Ok.
15. Repeat steps 8-14 for Authentication, CabalCash, CabalGuild, cabalmanager, EventData, NetcafeBilling, and Server01 databases. Be sure you name them the correct names and restore from the associated devices. MAKE SURE YOU GO SLOW AND YOU WILL NOTICE WHEN YOU CLICK RESTORE DATABASE THE "TO DATABASE" MAY CHANGE AND YOU MAY HAVE TO CHANGE IT TO THE DATABASE YOU ARE ATTEMPTING TO RESTORE When you are done it should look like this:

16. Now in the Server Objects folder right click Linked Servers and select New Linked Server
17. Fill it out like this:

Code:
DRIVER={SQL Server};SERVER=localhost;UID=;PWD=;
19. Hit OK
Databases restored and set up
Setting up CentOS
** Download Oracle VirtualBox here and the CentOS 5.8 DvD Full here and install VirtualBox. Download POWERISO from here and install it.***
1. Open VirtualBox, Click New name it "CentOS", choose Linux as the Type and other linux as the version. Hit Next and choose 2048 as the RAM, hit next then choose Create a virtual drive now and hit Create. Select VDI from the new window that pops up and hit Next, then select fixed size and hit next, then choose 40.98 gbs then hit create.
2. Click your new CentOS Vbox you created and then hit settings, Click network and then select Bridged instead of NAT (ONLY if you have a router). Then hit OK
3. Open your computer, you should see a virtual disk drive. Right click that, navigate to PowerISO > hit Mount image and select the disk 1 of centos you downloaded.
4. Click start on the CentOS vbox, a pop up will ask which drive you want to load centos from. Select your Virtual Disk drive with Disc 1 of centos mounted see my pic:

5. Hit Start
6. Hit Enter to start installation. Next it will ask to test the disc, hit skip. Next the graphical interface of CentOS installation will load up. Once it does hit next. Choose English, hit next. Choose U.S. English, hit next. A pop up will pop up asking if you want to partition, hit yes. On the next screen choose "Remove linux partitions on selected drives and create default layout.", hit next. A popup will asking if you want to partition for 41gb. HIT YES! if you dont have a big enough HDD you shouldnt be hosting in the first place. On the next screen hit next. On the next screen choose the yellow dot closest to your region. This is for the timezone. Hit next. on the next screen it will ask you to set up a password, type something and hit next. Now scroll down and check the boxes for Server, and Server - GUI. Hit next. Now hit next to begin installation.
7. Next to the bottom right click the disc icons and click remove disc. Then hit Reboot.
8. CentOS will begin to open for the first time. Once loaded hit Forward, Change Firewall to Disabled. Hit Forward. A popup will pop up asking if you are sure. Hit yes. On the next screen hit forward. Hit Forward again. On the date and time tab make sure its correct and hit forward. On the Create User page fill out the boxes and hit forward. Hit forward twice then hit finish. Now log in with root and the password you created.
9. Click Applications > Accessories > Terminal then type in "ifconfig" and hit enter. You then should see a bunch of text pop up similar to if you typed in ipconfig in cmd. Write the inet addr: address down. Thats your CentOS IP. Now hit the Earth icon with a mouse on it to open the web browser. Navigate to google.com to see if your internet works.
10. Hit System > Shutdown. This will shut down the vbox centos. This is how you always want to power down, similiar to shutting your real pc down.
11. Now right click CentOS in Vbox and click Clone. Name it CentOS backup. That will back CentOS up incase you mess anything up so you dont have to go through the long process again. This cloneing process can take a long time. So once again make sure your PC doesnt turn off. Go workout, go do parkour, go make sweet love to your special someone, or your hand. And then return back to this guide!
Setting Up the Server
*** You will need PuTTy and WinSCP for this section. Google will find you those links. ***
1. Open CentOS and log in to root, open terminal from Accessories > Applications section.
2. Type in "ifconfig" copy the inet addr: ###.##.#.### down. Thats your centos ip.
3. Open WinSCP and type in your CentOS IP as the Host Name. Now enter "root" as the username and your CentOS root password in password and hit Save...
4. Now hit login on WinSCP. it will ask you to save it in the Cache. Click yes
5. On WinSCP click Options > Preferences. Now click Applications under Intergration tab. Browse to where you saved your PuTTy exe. I saved mine in ""C:\CABAL\winscp and putty\putty.exe"" Make sure the boxes that say "remember session password and pass it to putty" and "open TelNet sessions in putty for FTP sessions" are checked and hit okay. Now click the putty icon in WinSCP (its under the word Sessions at the top. Looks like your PuTTy.exes icon. A pop up will ask you are you sure. Hit Run. Now Hit yes on the next pop up then once its loaded type "yum update". It will begin to update CentOS and eventually ask you if you want to download a update. Hit Y then enter. Next it will ask if importing is okay. Hit Y then enter. It will begin to import stuff. Let it work its magic.
6. Several minutes later in WinSCP ensure on the right side you are in CentOS's root folder. On the left side navigate to where you extracted Ep8repack to. Mine is C:\CABAL\ep8repack\. highlight everything in you ep8repack folder and hit f5: copy a popup will pop up. Hit Copy.
7. Once step 6 is done open Putty again. now type "./cabal_install.sh" it will ask if you want to begin the installation. Hit Y then enter. It will ask are you sure hit Y then enter.
8. Now that the files are installed type "service cabal config". Open CMD and type in "ipconfig" and hit enter. At the top you should see a ip. Use that as the MSSQL server ip in Putty and hit enter. For the SQL user type sa and hit enter. Then put your MSSQL pass and hit enter. Now open up your internet. Google search what is my ip. You will see a IP. Put that in putty and hit enter. Now type in "service cabal start" on they all say OK then the server is started.
Some times services will stop. Just type "service NAME HERE start" example "service ChatNode_01 start" to start ChatNode_01 service.

Setting Up the Client
*** You will need a EP8 Client you can refer to this page and the Client patch here ***
1. Install the Ep8 Client you downloaded.
2. Extract the CabalClientPatch_DARKSTEELMAN.rar to your pc. Edit the internal file in the Data folder to your CentOS ip. You should know it already. If not open CentOS or in PuTTy type ifconfig. Use that. Save internal.
3. Copy the Data folder and the cabal_start.bat and paste it in your Cabal ep8 client folder.
4. Use the start cabal bat to load your client.
Reserved for Error Fixes