Welcome!

Join our community of MMO enthusiasts and game developers! By registering, you'll gain access to discussions on the latest developments in MMO server files and collaborate with like-minded individuals. Join us today and unlock the potential of MMO server development!

Join Today!

BR/Jan/June Server And Client SETUP Guide!

Status
Not open for further replies.
Banned
Banned
Joined
Jan 13, 2007
Messages
1,898
Reaction score
65
REQUIREMENTS​
Winodws(XP(SP2+), Vista(SP1), 7(not RC or beta))
or
Windows server (2003 or 2008)

x86(32bit)

RAM:512MB(as a minimal i would give it 1gig alest)


DownLoads!​

Updated Database
Password= Phoenix


Gunz Client Runnable(must use)
(must use)

FileList Maker(CRC32 code for filelist)

ZPatcher(for Launcher updates)


Web Files


useful links:
http://www.ipchicken.com/ - to find your WAN IP
http://www.portforward.com/ - for ports

How To Install MSSQL 2008:
SQL Server Express database engine:

click Get the Web Platform Installer(the green button)
then install it
once installed click "Finish your installation" on the web site

when the installer/downloader pops up click install
click "I Agree"
click mixed mode make a password(needs to have numbers and cap letters in it)
then click install
restart if it asks you to.

Server Management Studio Express:
when the installer/downloader pops up click install
click "I Agree"
then click install
restart if it asks you to.

How to setup your Br-Gunz Client and Server:
First Client sided:

how to use mrs.exe:​
1.open startmenu then open run
2.type notepad, press enter
3.type:

To unpack/decompress use:

Code:
mrs.exe d file.mrs

To pack/compress again use:

Code:
mrs.exe c foldername

then click file then click SAVE AS type:
pack.bat, unpack.bat

making sure its NOT saved as text
(make sure its on "all files" as type of file)

Changeing The Clients IP
Unpack System.MRS(found in the main folder)
open system.xml(with note pad)
and change it so it looks like this:
Code:
<?xml version="1.0" encoding="UTF-8" ?>
<XML>
    <XMLHEADER>version="1.0" encoding="UTF-8"</XMLHEADER>

    <SKIN>Default</SKIN>

    <DEFFONT>Arial</DEFFONT>

    <IME>true</IME>

    <BAREPORT>
        <ADDR>www.battlearena.com</ADDR>
        <DIR>incoming/gunz_global</DIR>
    </BAREPORT>

    <EMBLEM_URL>http://webstore.theduel.com.br/ClanManager/ClanImages</EMBLEM_URL>

    <HOMEPAGE>
        <URL>http://www.gunzonline.com</URL>
        <TITLE>GunZ the Dual</TITLE>
    </HOMEPAGE>
    
    <LOCATORLIST>
        <LOCATOR id="1" IP="WAN IP" />
    </LOCATORLIST>
    
    <TLOCATORLIST>
        <LOCATOR id="1" IP="WAN IP" />
    </TLOCATORLIST>
</XML>

amd save it make a copy of it
make a new folder then place BOTH the copy of system.xml and filelist.exe
into the new file
then run filelistgen.exe(you will see a new file made)
open the filelist.xml
copy the CRC code
go back to Unpacked system.xml folder and open the file called filelist.xml
scroll to the bottom you will find system.xml
pasted the new crc code where it says system.xml
then pack system.MRS(rembering to remove the unpacked system.mrs formt he main folder)

DATA BASE AND SERVER SETUP!


Step 1 - Setting up the Database and ODBC:
Creating/Connecting the Database
Open Server Management Studio Express* (SMSE). Within the Object Explorer Panel you will notice the 'Database' folder, right click it, click 'New Database...'.
A 'New Database' form will open, and in the text input type 'GunzDB' and click OK, your database has been created.
The next thing you are going to want to do is open the Database. Click File> Open> File... and locate your GunzDB.sql file and open it.
In the toolbar there is a drop-down menu with the 'master' database selected, click on the arrow and select the 'GunzDB' database and click the button next to the drop-down menu, 'Execute'. A message showing 'Command(s) completed successfully.' should notify you that you have done this all correctly.

Creating the ODBC
Click Start> Run> and in the windows input type 'odbcad32'(or just type odbcad32 in seach bar for vista/7 users. You should already be in the 'User DSN' tab so change it to 'System DSN' then click on 'Add'. Another window should pop-up. You'll have to scroll all the way down to the bottom and select 'SQL Server' then click 'Finish'.
Another window/form will pop-up needing information for your new Data Source. For the name, type 'GunzDB', for the description you may type whatever you like, but for the SQL server you which to connect to, you must go back into SMSE*, look in the SQL Editor tool bar and click the 2nd icon which will disconnect you from data engine. Now click the 1st icon which will re-connect you, but make sure to copy the 'Server name' this time, then click 'Connect'.
Now having that in hand, you can go back to creating your ODBC and in the 'Server' text input, paste in your server name. Click next since the settings are currently fine. Now in the next part, click on the tick box and select 'GunzDB' from the drop-down menu and click 'Next' and finally click 'Finish'.
If you would like to check your data source, click 'Test Data Source...' in the window or you can just click 'OK' to finish. Now to completely finish it, click 'OK' again.

Step 2 - Configuring the Server:​
Place the server files in your C:\ drive and extract them into a folder with the name 'GunzServer'. Once in the folder, go to the 'Locator' folder and then open the 'Locator.ini' file. Somewhere in the file you should see these lines of code:

[NETWORK]
IP="217.0.0.1"
PORT="8900"

You can either change the '217.0.0.0' to your actual IP or localhost which is '127.0.0.1'. Besides that everything else is fine.
Make your way to the MatchServer folder and run 'MatchServer.exe', once loaded you may minimize it.

Step 3 - Creating an Account (Manually):
Bring up SMSE and expand the 'Database' folder if it hasn't already been done. Expand 'GunzDB', expand 'Tables' and right click on 'dbo.Accounts', 'dbo.Login' and 'Edit 200 rows'.
You do not need to worry about the AID field as that is an automatic generation of account number(Login you will have to add the AID from 'dbo.Accounts'). In the UserID field, type your account ID, in the Password field, type your account password and in the UGradeID and PGradID, type in your account grade.

Account Grades
Administrator - 255
Developer - 254
Banned - 253
Administrator (with normal name) - 252
Jjang - 2 (event winner)
Normal User - 0

MAKE SHURE you have opened the dbo.login and put the same name as you have put in
dbo.Account and put you password there to
After you have typed all of that in, press enter and on the SQL Editor toolbar click 'Execute' (The exclamation mark symbol).

Item Match!:
unpack system.mrs(explanded above), open the system folder
copy zitem.xml and paste it into your matchservers main folder

LOCATOR setup in the DB(in SQL)​
this table can be found in tables in SQL
MAXTRAXv3 - BR/Jan/June Server And Client SETUP Guide! - RaGEZONE Forums

Code:
ServerID= 1
CurrPlayer= 0
MaxPlayer= 200
Time= 11.03.2207 0:00:00 (copy and paste the time)
IP= [YOUR IP(WAN)]
Port= 6000
ServerName= MatchServer1
Opened= 1
Type=4
TYPES:

Code:
1=Debug Server
2=Normal MatchServer
3=Clan WarServer
4=Quest Server
5=Event Server

dont forget to put the types in the Table servertype.dbo

Code:
1=Debug Server
2=Normal MatchServer
3=Clan WarServer
4=Quest Server
5=Event Server

open locator folder open locator.ini
and change this to yours:

Code:
[DB]
DNS="GunzDB"
USERNAME="sa"
PASSWORD="password"

[NETWORK]
IP="YOURWAN"
PORT="8900"

Ports to forward
6000 tcp
5100 udp
7000 to 7777 tcp and udp
8900 tcp
80 tcp

Config AgentConfig.xml
Code:
<?xml version="1.0" encoding="euc-kr"?>
<XML>
<AGENTCONFIG>
<NAME>Name this server</NAME>
<MAXCLIENT>500</MAXCLIENT>
<MATCHSERVERADDRESS ip="127.0.0.1" tcpport="6000"/>
<ADDRESS ip="YOU IP WAN" tcpport="7777" udpport="5100"/>
</AGENTCONFIG>

</XML>

Config MatchServer
open server.ini in the matchserver folder

Code:
[DB]
DNS="GunzDB"
USERNAME="sa"
PASSWORD="123456"

[SERVER]
MAXUSER=500
SERVERID=1
SERVERNAME="SERVER NAME(must be the same one you put in the serverstatus tabe in SQL)"
FREELOGINIP="WAN IP"
KEEPERIP="WAN IP"
MONITORIP="127.0.0.1" <--LEAVE
MONITORPORT=9000
MODE="test" <--test = Quest server, clan = Clan War, event = Event server, normal = Normal match server
COUNTRY="BRZ" <--LEAVE
LANGUAGE="BRZ" <--LEAVE
USETICKET="0" <--LEAVE

[LANGUAGE]
LANG_TYPE="eng" <--LEAVE

[LOCALE]
DBAgentPort=5100 <--Must be the same in match agent
DBAgentIP=127.0.0.1 <--LEAVE

[FILTER]
USE="0" <--LEAVE
ACCEPT_INVALID_IP="1"<--LEAVE

[ENVIRONMENT]
USE_HSHIELD="0"<--LEAVE
USE_XTRAP="0"<--LEAVE
USE_EVENT="0" <-- LEAVE
USE_FILECRC="0" <-- LEAVE
USE_MD5="0"<--LEAVE

Auto-Update!;

WAMP folders:
Click on WAMP Icon(bottom left of screen on start bar)
and click www dir
then make a folder called; gunzweb
and in that folder make a new folder called; GunzUpdate
Close that folder
open the www dir again
then make a folder called; Launcher
place the start.html and launcher_files in the folder named; Launcher

Download ZPatchBuilder and place it in your 'GunzUpdate'(in your www dir)
Now, copy all your files in Gunz folder and paste them into GunzUpdate. Delete off files like; Mlog, lastuser.dat, patch.xml, patchlog.
change the name of theduel.exe to Gunz.exe
Run ZPatchBuilder
It should generate a patch.xml.
now open the file and seach for patch.xml and ZPatchBuilder
and remove the name and the code till the next word.
also seach for Gunz.exe and change that back to theduel.exe
and save it
Your auto-update is ready to be used.

Editing Launcher[/center]
Now open your edited Launcher with HexEditor
Press CTRL+F(or click edit>Find)
Select "Text String" and Value type in "http" and scroll down till you see ip for updates
you will see some thing like this "http://127.0.0.1/Launcher/start.html"
Change the IP to ur WAN IP
also change the IP after the Word unknowen and Gunzupdate(you will see if you scroll down alittle)

if its shorter or londer then the orginal value select the first
click on the last letter/number of you host.
You will see that the that there is numbers on right side.
Now click there and make the values that you dont need 00.
If you do it right the numbers and letters will change to "."'s

Now your done with the launcher. Save it

credits and thanks to:
Thugie
thebestkiller
Rotana
RepublicOfAstra
MAXTRAXv4,v3,v2
SlayR.
BoTGoD
Whoever created the MRS Unpacker (RepublicOfAstra's Edit: It was CBWhiz ;))
kekku500
-Lambda-
shadow-xx
7-Eleven
System32(for server files Repack)
[THD]Dev Team(for english modded match agent)
godofthestaf (for loctor upload)
dspek (for helping me fix some links)
maxteam (for the runnables and launcher)
Kingston
Omer
DarkChas
WizKid
emisand
alexey1234
Mr.MafiaCoder
XZeenon
Gosu[ru]
Phoenix(phoenix_147)(for cleaning up database)
 
Last edited:
Banned
Banned
Joined
Jan 13, 2007
Messages
1,898
Reaction score
65
Re: [TuT] BR/Jan/June Server And Client SETUP Guide!

MODDING

THIS IS A WARNING BACK UP EVERY THINK!
ALSO REMEBER YOU HAVE TO UPDATE FILELIST ON EVERY THINK!

{DOWNLOADS}

Press F9 to enable dev mode ingame.
(for photo shop)


YOUR OWN MUSIC!
you will need to find your BGM.MRS(Gunz/Sound/)
also you will need to know how to use MRS.EXE
and an OGG Converter(google for it)
oh and about 6 of your own songs

convert the song you want to ogg format
unpack bgm.mrs
rename the songs you want to the names of the songs that are in bgm
copy into bgm folder
pack bgm
now you have done it!, ezy!

MAKEING A NEW WEAPON!
you will need to know how to use MRS.exe
and Photoshop and have the dds plugin(google for it)

MOVE MODEL.MRS INTO A NEW FOLDER(or it will get muddled up)
unpack model.mrs(Gunz/)
find a weapon you like and edit the pic(model/weapon/)
rename the pic and save it as a .dds now find the .elu file that wet with it
open it up with notepad press Ctrl + F enter its old name and rename that to your new name save it
and rename the .elu file

open weapon.xml(right click>edit), for this tut will be making a sword!
we will be editing this code here:
Code:
 <AddWeaponElu name="sword01" weapon_motion_type = "12" weapon_type = "16" >
  <AddBaseModel name="sword01" filename="model/weapon/sword/sword01.elu" />
 </AddWeaponElu>
you need a name for you weapon, im going to call mine: Lkive
now to change that do this
Code:
<AddWeaponElu name="sword01"
to
Code:
<AddWeaponElu name="Lkive"
and this
Code:
 <AddBaseModel name="sword01"
to
Code:
  <AddBaseModel name="Lkive"
ok now you have done that make a folder for your new weapon in "modelweapon"
for this tut im going to call mine: Lkive
now we change
Code:
filename="model/weapon/sword/sword01.elu"
to
Code:
filename="model/weapon/Lkive/Lkive.elu"
so you will have now
Code:
 <AddWeaponElu name="Lkive" weapon_motion_type = "12" weapon_type = "16" >
  <AddBaseModel name="Lkive filename="model/weapon/Lkive/Lkive.elu" />
 </AddWeaponElu>
save that
now zitem
press ctrl + F now type in the old name of the weapon mine would be sword01

Code:
 <ITEM id="36" name="Skull Giant Sword" iscashitem="false" mesh_name="sword01" totalpoint="0" type="melee"
  res_sex="a" res_level="20" slot="melee" weapon="greatsword" weight="21" bt_price="12000"
  delay="275" damage="21" ctrl_ability="0" magazine="0" reloadtime="0" slug_output="false"
  gadget_id="0" hp="0" ap="0" maxwt="0" sf="0" fr="0" cr="0" pr="0" lr="0" color="#FFFFFFFF"
  image_id="0" bullet_image_id="0" magazine_image_id="0" desc="" />

now we will need to change the mesh
Code:
mesh_name="sword01"
and the id number
Code:
ITEM id="36"
to your own number...

ok whats what:
res_sex="a": what sex can use this item
iscashitem="false":prem or not
totalpoint="0": unknown (to me)
type="melee":type of weapon or clothing
res_level="20": minmal level
slot="melee":where you equip it
damage="21": damage
delay="275":attack speed
ctrl_ability="0":ctrl_ability means how you weapons spreads and recoil the higher the number the accuraty will be beter
magazine="0":how meny clips it can hold
reloadtime="0": how long it takes to reload
slug_output="false":slug_output can be true or false False means no bullets are coming out of the weapon Ture means bullets out of you weapon
So melee = False and ranged = true
gadget_id="0":unknown
hp="0":hp
ap="0":ap
weapon="greatsword":where it will show up(buying group)
bullet_image_id="0":unknown or dosent work(tested not much tho)
image_id="0":unknown
weight="21":weight
bt_price="12000": how much it costs
maxwt="0": +weight(gives more)
sf="0":bonus(unknown to me)
fr="0":Fire
cr="0":Cold/Ice
pr="0":poision restance
lr="0":Lighting
color="#FFFFFFFF":unknown
magazine_image_id="0":unknown or dosent work(tested not much tho)
desc="":decsrpition(cant spell sorry)

once you have done that add it to your shop.xml and copy a copy of zitem into matchserver
and your done

MAKE YOUR ITEM PICKUPABLE(ADDON TO MAKEING YOUR OWN WEAPON)
make your item like a medkit(or some think pickupable)
you will need MRS Unpacker

unpack system.mrs
open worlditem.xml(right click>edit)
what we need to edit

Code:
        <WORLDITEM id="01" name="hp01">
            <TYPE>hp</TYPE>
            <TIME>3000</TIME>
            <AMOUNT>10</AMOUNT>
            <MODELNAME>red</MODELNAME>
        </WORLDITEM>
whats, what:
<TYPE>hp</TYPE>:can be hp,ap,bullet or quest and can be stacked like this: <TYPE>hpapbullet</TYPE>
<TIME>3000</TIME>: i think respwan time
<AMOUNT>10</AMOUNT>: how much ap,hp,etc
<MODELNAME>red</MODELNAME>:this is this part heres name:<AddBaseModel name="sword01"
<WORLDITEM id="01" name="hp01">:nuber and name of it number has to be 132 and above

i have yet to get <MeshInfo> to work...


Custom Login Screens:
Things you'll need.

- Developer mode runnable (See top of post).
-A brain

Let's get started.

First, unpack the Login.mrs in the Interface folder in Gunz. Open up Login.RS.XML. See this somewhere near the bottom? (Note, number won't be 0s)

Code:
        <DUMMY name="spawn_solo_101">
            <POSITION>0.0 0.0 0.0</POSITION>
            <DIRECTION>0.0 0.0 0.0</DIRECTION>
        </DUMMY>
        <DUMMY name="camera_pos 02">
            <POSITION>0.0 0.0 0.0</POSITION>
            <DIRECTION>0.0 0.0 0.0</DIRECTION>
        </DUMMY>
        <DUMMY name="camera_pos 01">
            <POSITION>0.0 0.0 0.0</POSITION>
            <DIRECTION>0.0 0.0 0.0</DIRECTION>
        </DUMMY>

Copy that and save it somewhere for now. Now, unpack your map that you wanna use as a login map. first of all, change all the important filenames (the BSP, COL, LM, RS, RS.XML, and minimap.xml) so the map name is Login instead of whatever it was before, and rename the folder it's in to login. Now, open up the RS.XML in the new map and scroll toward the bottom. If it has one, delete the spawn_solo_101. Now, the part we copied earlier, paste it into the RS.XML of the new map, in the same area the spawn_solo_blahs are.

Now, here's where the hard/fun begins. Chances are, the part you just pasted in has terrible coordinates and spawn points for the character. Technically you could pack the new login into an MRS and use it as it is, but it would look disgusting. So, here's where the developer mode runnable comes in. Use debug mode (not gonna explain how, just google) and play in debug mode in the map you want as a login with the developer runnable. While ingame, pull up the dev menu (explained at the download) and go where you want in the map. Get your character in the exact position you want it to face and be in the login map. See the direction and coordinates of the character? Put those numbers into the <POSITION> and <DIRECTION> areas of the spawn_solo_101. For the camera it's basically the same thing, just use your character to approximate where you want the camera to start and end and where to face. It's not hard.
Now just pack it all up into an MRS once you have the coords and directions put in and you should be good to go. Congratulations, you have a custom login map.

How To Edit clothes/weapons
Tools:
- Photoshop(see top)
- Mrs Unpacker / Packer(see top)
- dds Plugin(see top)

will be opening man.mrs located in wherever it is installed/model/man.mrs COPY it into the same directory as mrs.exe and cmd.exe, now run cmd.exe and type mrs.exe and the press your enter key some text will appear under the line you wrote this is instructional showing the 2 commands u can use with mrs.exe
MAXTRAXv3 - BR/Jan/June Server And Client SETUP Guide! - RaGEZONE Forums


now you have cmd open type mrs.exe d man.mrs this will decompile the mrs.exe right in front of your eyes :0

now you have a man folder and a man.mrs open the man folder(you can close down cmd.exe now if you want)right click the file and open it with photoshop

you should see this small menu make sure it looks the same as the screenshot shown

MAXTRAXv3 - BR/Jan/June Server And Client SETUP Guide! - RaGEZONE Forums


Shot at 2007-07-18
You Can Now Start Editing You Items and Releaseing them Here at RageZone!

once you have finished editing you need to know how to save correctly right?

file>save as>pick your location and you should get another little gui use the same options as shown in the folowing screenshot

MAXTRAXv3 - BR/Jan/June Server And Client SETUP Guide! - RaGEZONE Forums


Shot at 2007-07-18
The End.

Making an Installer.
1. Download install Creator(see top)
2. Install The program :p
3. Open it up, You'll have a window saying : "Welcome to the install creator wizard"
4. Click next once. You should get something like this :
MAXTRAXv3 - BR/Jan/June Server And Client SETUP Guide! - RaGEZONE Forums


5. Click browse and locate your GunZ folder. double click it and press ok.
Press next. You should now have something like this :
MAXTRAXv3 - BR/Jan/June Server And Client SETUP Guide! - RaGEZONE Forums


6. Enter the name of your gunz and press next.

7. in the next screen Choose "Full size" and choose your colors and leave the name box.

8. In the next screen unless you have a logo for your gunz don't do anything for it. If you do have a logo press browse and find it then double click it.

9. Now press Next DO NOT DO ANYTHING IN THIS SECTION
10. press next. In this text box enter your Server info
11. Press next. In this text box enter your server Terms of Agreement.
12. Now enter the folder you want the server to be installed in like Leave Program files as it just replace the server name it put it!:
Code:
#Program Files#Omergunz

something like this :
MAXTRAXv3 - BR/Jan/June Server And Client SETUP Guide! - RaGEZONE Forums


13. press next and don't do anything.
14. again press next and don't do anything.
15. press next again
16. press next again :p
17. and again :D
18. and your done just wait for it to install and it'll put the file somewhere.

How to Change EXP
goto your server file and look for matchserver then formula.xml and open it.....

Then you see alot of text Oo

heres the 3 BIG commands to change exp and bounty on your server

<FORMULA_TABLE id="NeedExpLM"> Is how much EXP you need to lvl up.

<FORMULA_TABLE id="GettingExpLM">How much exp you get for killing


<FORMULA_TABLE id="GettingBountyLM"> how much bounty you get for killing

so on GettingExpLM is i want x18 exp i do this.
Code:
<FORMULA_TABLE id="GettingExpLM">
    <LM lower="1" upper="20">1</LM>
    <LM lower="21" upper="30">18</LM>
    <LM lower="31" upper="40">18</LM>
    <LM lower="41" upper="45">18.1</LM>
    <LM lower="46" upper="50">18.1</LM>
    <LM lower="51" upper="55">18.1</LM>
    <LM lower="56" upper="60">18.1</LM>
    <LM lower="61" upper="65">18.1</LM>
    <LM lower="66" upper="70">18.1</LM>
    <LM lower="71" upper="75">18.1</LM>
    <LM lower="76" upper="80">18.1</LM>
    <LM lower="81" upper="85">18.2</LM>
    <LM lower="86" upper="90">18.2</LM>
    <LM lower="91" upper="95">18.2</LM>
    <LM lower="96" upper="99">18.2</LM>
</FORMULA_TABLE>

save it load Gunz kill some1 and u got x18 exp =]

Requirements :

MRS Unpacker
updated IJJI files you need
A brain
-------------------------------------------------------

NOTE: MAKE BACKUP OF YOUR FILES BEFORE EDITING THEM SO YOU DONT NEED TO RE-INSTALL IJJI IF YOU MESSED UP!

-------------------------------------------------------

Tutorial :
1. Make a new folder on your desktop called "IJJI Weapons"
MAXTRAXv3 - BR/Jan/June Server And Client SETUP Guide! - RaGEZONE Forums


2. Open your IJJI Gunz Folder ( C:\IJJI\English\gunz )

3. Copy System.mrs and paste it on your "IJJI Weapons" folder

4. Copy your MRS Unpacker and paste it on your "IJJI Weapons" folder too
MAXTRAXv3 - BR/Jan/June Server And Client SETUP Guide! - RaGEZONE Forums


5. Open the MRS.txt folder and type the following code :

Code:
mrs.exe d system.mrs

6. click on "Files > Save As..."
7. name it "unpack_system.bat" Just like this and press "Save" :
MAXTRAXv3 - BR/Jan/June Server And Client SETUP Guide! - RaGEZONE Forums


8. Run the "unpack_system.bat" and let it unpack the system.mrs :
MAXTRAXv3 - BR/Jan/June Server And Client SETUP Guide! - RaGEZONE Forums


9. when its done! open "System" Folder and copy these 2 files (Strings.xml,Zitem.xml) :
MAXTRAXv3 - BR/Jan/June Server And Client SETUP Guide! - RaGEZONE Forums


10. Paste these 2 files on your Gunz Folder!

11. Copy the system.mrs from your gunz folder!

12. Repeat the same steps with your system.mrs (step 5,6,7 and 8)

13. Now Grab the 2 files you pasted "Strings.xml" and "Zitem.xml" and move them to your new "System" Folder and replace!

14. then start adding weapons to your server by using the new "Zitem.xml" and "Strings.xml"
 
Last edited:
Banned
Banned
Joined
Jan 13, 2007
Messages
1,898
Reaction score
65
Re: [TuT] BR/Jan/June Server And Client SETUP Guide!

Simple Reg Page!

DOWNLOADS
- plz dont remove credits on that page


you will need WAMP(in downloads)
and no-ip if you wish to hide your ip from ppl

first we gotta install it(WAMP) duh...
i find the fastest way to do this is to keep clicking next button
if any think pops up click yes

once ya done go to c:/WAMP/www
once ya there put WizKids Reg page in there(found at downloads)
close that now open start click run(for vista users just click start then click on the seach bar at the buttom of the start menu) then type: odbcad32

you should alredy have a GunzDB in user DSN
you now need to make one in system DSN so click that tab then
click on 'Add'. Another window should pop-up. You'll have to scroll all the way down to the bottom and select 'SQL Server' then click 'Finish'.

Another window/form will pop-up needing information for your Data Source. For the name, type 'GunzDB', for the description you may type whatever you like, but for the SQL server you which to connect to, you must go back into SMSE*, look in the SQL Editor tool bar and click the 2nd icon which will disconnect you from data engine. Now click the 1st icon which will re-connect you, but make sure to copy the 'Server name' this time, then click 'Connect'.

Now having that in hand, you can go back to creating your ODBC and in the 'Server' text input, paste in your server name. Click next since the settings are currently fine. Now in the next part, click on the tick box and select 'GunzDB' from the drop-down menu and click 'Next' and finally click 'Finish'.

If you would like to check your data source, click 'Test Data Source...' in the window or you can just click 'OK' to finish. Now to completely finish it, click 'OK' again.

now we need to make the web site viewerable bye other ppl
LEFT click on the icon then click this:
MAXTRAXv3 - BR/Jan/June Server And Client SETUP Guide! - RaGEZONE Forums


after that you now have to edit the reg page it self
right click on it and click open with then click notepad
and this is what you have to edit:
Code:
$user="sa"; <--- the user name to log into MSSQL
$pass="PASSWORD HERE!"; <--- the password to log into MSSQL
save it then try it out
others will need to use your WAN ip or the no-ip to see it
WHAT IS MY WAN IP: (BIG BLUE NUMBERS)

NOW YOUR DONE!

and if ya have any trobbles running a mssql script click this:
MAXTRAXv3 - BR/Jan/June Server And Client SETUP Guide! - RaGEZONE Forums


then this:

MAXTRAXv3 - BR/Jan/June Server And Client SETUP Guide! - RaGEZONE Forums


Hideing your IP(web only)
comming soon....

Removing the maiet logo
You will need
1.mrs unpacker
2.Photoshop
3.PH DDS Plug-in

1.unpack your default.mrs
2.Go to default/combat. find "maiet_logo01" and open it with Photoshop.
3.Go to channel tab:


MAXTRAXv3 - BR/Jan/June Server And Client SETUP Guide! - RaGEZONE Forums


4.select all (Ctrl+A) and delete all

MAXTRAXv3 - BR/Jan/June Server And Client SETUP Guide! - RaGEZONE Forums


5.in the channel list go to Alpha 1

MAXTRAXv3 - BR/Jan/June Server And Client SETUP Guide! - RaGEZONE Forums


6.delete all
now you should have a black screen
7.save
8.compile to mrs
9.replase with your old default.mrs
done! u dont have maiet logo!

u can add ur own custom logo i dont wanna make a tut so ill just tell u basic

make a alpha back ground tha same size and the maiet logo

and add ur own *****

TroubleShooting:
Q. My server wont show up, what am i doing wrong?
A.
first check that the ports listed are portforwarded to the Servers LAN ip

second check that you have correctly updated filelist

3rd check that you have the right info in locator.ini, server.ini and in your data base (database > GunzDB > tabes > serverstatus.dbo (right click on it and click open))
NAME OF MATCHSERVER AS WELL

4th check that you have the right IP in your config files and that your ip doesnt change (E.G. unplug your router and plug it back in and see if the same ip comes up)


Dont see what ya want here; ASK FOR IT!

creds and thanks:
Thugie
thebestkiller
Rotana(thanks agen for the server file upload)
RepublicOfAstra
MAXTRAXv4,v3,v2
SlayR.
BoTGoD
Whoever created the MRS Unpacker (RepublicOfAstra's Edit: It was CBWhiz ;))
kekku500
-Lambda-
shadow-xx
7-Eleven
System32(for server files Repack Rev 5, love your work! keep at it!)
[THD]Dev Team(for english modded match agent)
godofthestaf (for loctor upload)
dspek (for helping me fix some links)
maxteam (for the runnables and launcher)
Kingston
Omer
DarkChas
WizKid
emisand
alexey1234
Mr.MafiaCoder
XZeenon
Gosu[ru]
this tut would not be here with out them

STILL! haveing problems
maxtraxv3@live.com - add me to msn or yahoo messager

THE NEWST IJJI ITEMS GO HERE:http://forum.ragezone.com/showthread.php?t=331793/

USE FULL LINKS!
WHAT IS MY WAN: (BIG BLUE NUMBERS)

HOW TO PORTFORWARD:

NO IP(to hide your ip when connecting to a web site)
 
Last edited:
Banned
Banned
Joined
Jan 13, 2007
Messages
1,898
Reaction score
65
Re: [TuT] BR/Jan/June Server And Client SETUP Guide!

reserved for later
 
DRGunZ 2 Creator
Loyal Member
Joined
Jan 21, 2007
Messages
4,493
Reaction score
161
Re: [TuT] BR/Jan/June Server And Client SETUP Guide!

damn xD long tut
 

~DN

Elite Diviner
Joined
Jul 31, 2008
Messages
452
Reaction score
4
Re: [TuT] BR/Jan/June Server And Client SETUP Guide!

o_O the tut again xD
 
Banned
Banned
Joined
Jan 13, 2007
Messages
1,898
Reaction score
65
Re: [TuT] BR/Jan/June Server And Client SETUP Guide!

BB code stuffed up in last one so i moved it
 
Joined
Apr 23, 2008
Messages
1,178
Reaction score
97
Re: [TuT] BR/Jan/June Server And Client SETUP Guide!

Hi everyone! Hi Maxtraxv3
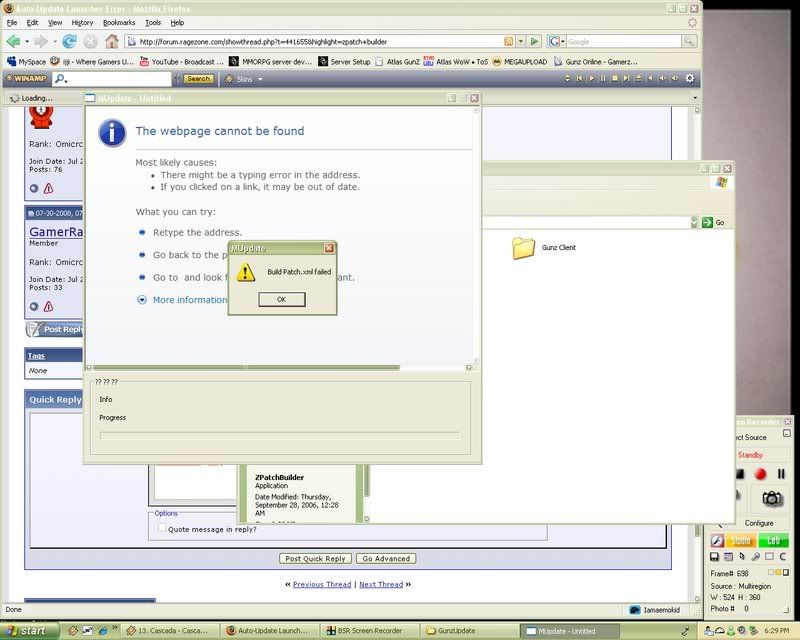
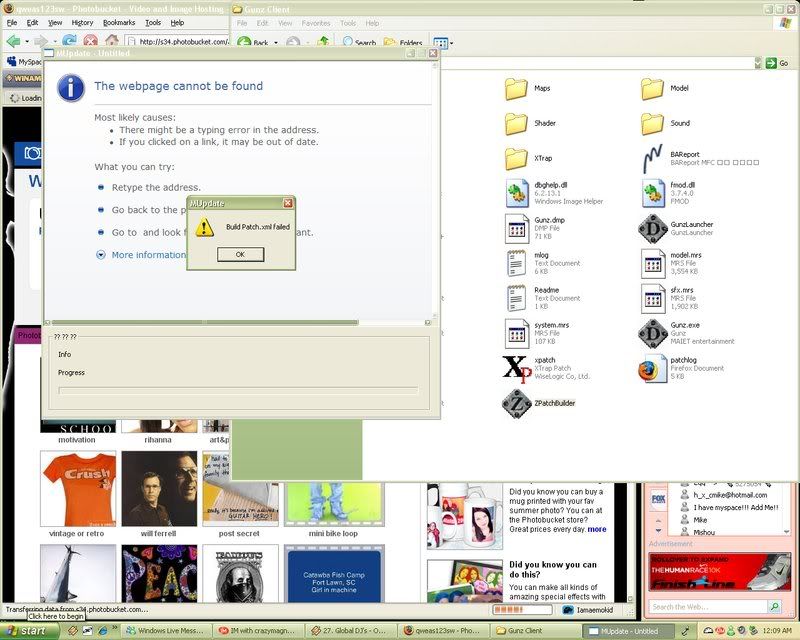
I got a question for all of you guys about the ZPatchBuilder. When i try to make a patch for my PGunZ it doesnt let me it says like Build Patch.xml Failed! Do any of you guys know why? I tried everything i put it in my Client folder that is also located in GunzUpdate
and outside of the Client that is located in GunzUpdate.
Here r some screenshots of both
Outside Client:
MAXTRAXv3 - BR/Jan/June Server And Client SETUP Guide! - RaGEZONE Forums

Inside Client:
MAXTRAXv3 - BR/Jan/June Server And Client SETUP Guide! - RaGEZONE Forums


If there is a forum that has an answer to this problem or better explains how to fix/use it can someone please redirect me to it b/c i've been searching on ragezone and the internet for about 2 hours >.> b/c i'm desperate at this point lol.
well ty for reading this! <333
 
Elite Diviner
Joined
Aug 27, 2007
Messages
410
Reaction score
118
Re: [TuT] BR/Jan/June Server And Client SETUP Guide!

Much better :D
 
Initiate Mage
Joined
Jun 27, 2008
Messages
1
Reaction score
0
Re: [TuT] BR/Jan/June Server And Client SETUP Guide!

err Nice And Maxteam Y u Closed Ur GunZ Server lol
I was Lvl 35 der!! :vegeta:
 
Gunz Developer / Support
Joined
Feb 3, 2008
Messages
568
Reaction score
45
Re: [TuT] BR/Jan/June Server And Client SETUP Guide!

Excellent.. Excellent 10/10 My friend Maxtraxv3.. a love you work!! I Love you work.. excellent :)
 
DRGunZ 2 Creator
Loyal Member
Joined
Jan 21, 2007
Messages
4,493
Reaction score
161
Re: [TuT] BR/Jan/June Server And Client SETUP Guide!

what client should the Developer Mode runnable work on? Its not working on my August client.
 
Master Summoner
Joined
Sep 5, 2007
Messages
528
Reaction score
24
Re: [TuT] BR/Jan/June Server And Client SETUP Guide!

nice guide
 
Extreme Coder - Delphi
Loyal Member
Joined
Sep 8, 2007
Messages
1,381
Reaction score
39
Re: [TuT] BR/Jan/June Server And Client SETUP Guide!

why are u using Mu Update?
 
Experienced Elementalist
Joined
Jun 14, 2008
Messages
228
Reaction score
17
Re: [TuT] BR/Jan/June Server And Client SETUP Guide!

err Nice And Maxteam Y u Closed Ur GunZ Server lol
I was Lvl 35 der!! :vegeta:

Dude U were Only lvl 35 i was lvl 50 Sad he closed the Gunz suspended the network and deleted the website. .:sad:.


On Topic :-: Nice Tutriol very Easy to Understand.
 
Junior Spellweaver
Joined
Jun 9, 2007
Messages
139
Reaction score
0
Re: [TuT] BR/Jan/June Server And Client SETUP Guide!

Woow Sorry that i even SAID that it was almost done...
 
Newbie Spellweaver
Joined
Nov 22, 2007
Messages
6
Reaction score
0
Re: [TuT] BR/Jan/June Server And Client SETUP Guide!

Wich GunZLauncher.exe do we open? one of the ones we downlaoded?
 
Banned
Banned
Joined
Jan 13, 2007
Messages
1,898
Reaction score
65
Re: [TuT] BR/Jan/June Server And Client SETUP Guide!

@bounty-hunter it look like is, but its been modded to work with gunz files...(also alittle hard to find)

@number12 you have to rename theduel.exe to gunz.exe then it works

@DragonOfBlade theres still more to come...

@wesman2232 im not 100% shure how to use it ive never tested that before...

@sky_chaser AND freeza plz dont spam this!
 
Experienced Elementalist
Joined
Sep 11, 2007
Messages
295
Reaction score
2
Re: [TuT] BR/Jan/June Server And Client SETUP Guide!

everything is fine and good 10/10

but when u say
if its shorter then the orginal value select the first
click behind the last letter of you host.
You will see that the that there is an cursor on the right side. Now click there and make the values that you dont need 00. If you go it good you will
see the the letters change to "."

that confuses the hell out of me 0.0
 
Status
Not open for further replies.
Back
Top