Newbie Spellweaver
- Joined
- Jan 31, 2007
- Messages
- 19
- Reaction score
- 10
#1 Install Apache
Apache is an open-source multi-platform web server. It provides a full range of web server features including CGI, SSL and virtual domains.
To install Apache, enter the following command from your terminal:
Start the Apache service and let it to start automatically on every reboot:
Allow Port 80 in Firewall:
To do that, edit file /etc/sysconfig/iptables, (to edit press "a" to enter edit mode)
Add the following lines.
To save it hit <esc> then type ":w" and to exit the vi editor type ":q!" (without the ")
Restart iptables:
Test Apache:
Open your web browser and navigate to

#2 Install MySQL (Optional)
MySQL is an enterprise class, open source, world’s second most used database. MySQL is a popular choice of database for use in web applications, and is a central component of the widely used LAMP open source web application software stack.
To install MySQL, enter the following command:
Start the MySQL service and make to start automatically on every reboot.
Setup MySQL root password:(IMPORTANT!!)
By default, mysql root user doesn’t has password. To secure mysql, we have to setup mysql root user password.
#3 Install PHP
PHP (recursive acronym for PHP: Hypertext Preprocessor) is a widely used open-source general purpose scripting language that is especially suited for web development and can be embedded into HTML.
Install PHP with following command:
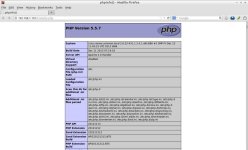
Test PHP:
Create a sample “testphp.php” file in Apache document root folder and append the lines as shown below:
Add the following lines. (to edit press "a" to enter edit mode)
To save it hit <esc> then type ":w" and to exit the vi editor type ":q!" (without the ")
Restart httpd service:
Install MySQL/MSSQL PHP Support
Navigate to

#4 Install phpMyAdmin (Optional)
phpMyAdmin is a free open source web interface tool, used to manage your MySQL databases. By default phpMyAdmin is not found in CentOS official repositories. So let us install it using EPEL repository.
To install EPEL repository:
For CentOS 5.x
For CentOS 6.x
Now install phpMyAdmin:
Configure phpMyAdmin:
Edit the phpmyadmin.conf file.
Find and comment the whole /<Directory> section as shown below:
Open “config.inc.php” file and change from “http” to “cookie” to change the authentication in phpMyAdmin:
# cp /usr/share/phpMyAdmin/config.sample.inc.php /usr/share/phpMyAdmin/config.inc.php
# vi /usr/share/phpMyAdmin/config.inc.php
Change http to cookie.
Restart the Apache service:
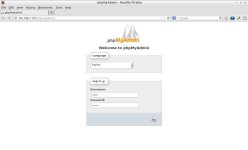
Now you can access the phpmyadmin console by navigating to

Enter your MySQL username and password which you have given in previous steps. In my case its “root” and “centos”.
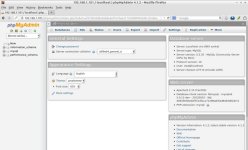
Now you will be redirected to the phpmyadmin dashboard.page as shown below.

That’s it. Your LAMP server is up and ready to use.
Cheers!
now using WINSCP simply upload XTrapUpdate Server By:dexter
to /var/www/html/
Apache is an open-source multi-platform web server. It provides a full range of web server features including CGI, SSL and virtual domains.
To install Apache, enter the following command from your terminal:
Code:
# yum install httpd -y
Code:
# service httpd start
# chkconfig httpd on
Allow Port 80 in Firewall:
To do that, edit file /etc/sysconfig/iptables, (to edit press "a" to enter edit mode)
Code:
# vi /etc/sysconfig/iptables
Code:
[...]
-A INPUT -m state --state NEW -m tcp -p tcp --dport 80 -j ACCEP
[...]Restart iptables:
Code:
# service iptables restartTest Apache:
Open your web browser and navigate to
Code:
http://localhost/ or http://server-ip-address/
#2 Install MySQL (Optional)
MySQL is an enterprise class, open source, world’s second most used database. MySQL is a popular choice of database for use in web applications, and is a central component of the widely used LAMP open source web application software stack.
To install MySQL, enter the following command:
Code:
# yum install mysql mysql-server -y
Code:
# service mysqld start
# chkconfig mysqld on
Setup MySQL root password:(IMPORTANT!!)
By default, mysql root user doesn’t has password. To secure mysql, we have to setup mysql root user password.
Code:
# mysql_secure_installationNOTE: RUNNING ALL PARTS OF THIS SCRIPT IS RECOMMENDED FOR ALL MySQL
SERVERS IN PRODUCTION USE! PLEASE READ EACH STEP CAREFULLY!
In order to log into MySQL to secure it, we'll need the current
password for the root user. If you've just installed MySQL, and
you haven't set the root password yet, the password will be blank,
so you should just press enter here.
Enter current password for root (enter for none): ## Press Enter ##
OK, successfully used password, moving on...
Setting the root password ensures that nobody can log into the MySQL
root user without the proper authorisation.
Set root password? [Y/n] ## Press Enter ##
New password: ## Enter new password ##
Re-enter new password: ## Re-enter new password ##
Password updated successfully!
Reloading privilege tables..
... Success!
By default, a MySQL installation has an anonymous user, allowing anyone
to log into MySQL without having to have a user account created for
them. This is intended only for testing, and to make the installation
go a bit smoother. You should remove them before moving into a
production environment.
Remove anonymous users? [Y/n] ## Press Enter ##
... Success!
Normally, root should only be allowed to connect from 'localhost'. This
ensures that someone cannot guess at the root password from the network.
Disallow root login remotely? [Y/n] ## Press Enter ##
... Success!
By default, MySQL comes with a database named 'test' that anyone can
access. This is also intended only for testing, and should be removed
before moving into a production environment.
Remove test database and access to it? [Y/n] ## Press Enter ##
- Dropping test database...
... Success!
- Removing privileges on test database...
... Success!
Reloading the privilege tables will ensure that all changes made so far
will take effect immediately.
Reload privilege tables now? [Y/n] ## Press Enter ##
... Success!
Cleaning up...
All done! If you've completed all of the above steps, your MySQL
installation should now be secure.
Thanks for using MySQL!
#3 Install PHP
PHP (recursive acronym for PHP: Hypertext Preprocessor) is a widely used open-source general purpose scripting language that is especially suited for web development and can be embedded into HTML.
Install PHP with following command:
Code:
# yum install php -yTest PHP:
Create a sample “testphp.php” file in Apache document root folder and append the lines as shown below:
Code:
# vi /var/www/html/testphp.php
PHP:
<?php
phpinfo();
?>Restart httpd service:
Code:
# service httpd restartInstall MySQL/MSSQL PHP Support
Code:
# yum install php-mysql -y
Code:
# yum install php-mssql -yNavigate to
You must be registered to see links
. It will display all the details about php such as version, build date and commands etc.
#4 Install phpMyAdmin (Optional)
phpMyAdmin is a free open source web interface tool, used to manage your MySQL databases. By default phpMyAdmin is not found in CentOS official repositories. So let us install it using EPEL repository.
To install EPEL repository:
For CentOS 5.x
Code:
# wget http://epel.mirror.net.in/epel/5/i386/epel-release-5-4.noarch.rpm
# rpm -Uvh epel-release-5-4.noarch.rpm
Code:
# wget http://epel.mirror.net.in/epel/6/i386/epel-release-6-8.noarch.rpm
# rpm -Uvh epel-release-6-8.noarch.rpm
Now install phpMyAdmin:
Code:
# yum install phpmyadmin -yConfigure phpMyAdmin:
Edit the phpmyadmin.conf file.
Code:
# vi /etc/httpd/conf.d/phpMyAdmin.conf[...]
Alias /phpMyAdmin /usr/share/phpMyAdmin
Alias /phpmyadmin /usr/share/phpMyAdmin
#<Directory /usr/share/phpMyAdmin/>
# <IfModule mod_authz_core.c>
# # Apache 2.4
# Require local
# </IfModule>
# <IfModule !mod_authz_core.c>
# # Apache 2.2
# Order Deny,Allow
# Deny from All
# Allow from 127.0.0.1
# Allow from ::1
# </IfModule>
#</Directory>
[...]
Open “config.inc.php” file and change from “http” to “cookie” to change the authentication in phpMyAdmin:
# cp /usr/share/phpMyAdmin/config.sample.inc.php /usr/share/phpMyAdmin/config.inc.php
# vi /usr/share/phpMyAdmin/config.inc.php
Change http to cookie.
[...]
/* Authentication type */
$cfg['Servers'][$i]['auth_type'] = 'http'; <<== should be 'cookie'
[...]
Restart the Apache service:
Code:
# service httpd restartNow you can access the phpmyadmin console by navigating to
You must be registered to see links
from your browser.
Enter your MySQL username and password which you have given in previous steps. In my case its “root” and “centos”.
Now you will be redirected to the phpmyadmin dashboard.page as shown below.

That’s it. Your LAMP server is up and ready to use.
Cheers!
to /var/www/html/
Attachments
You must be registered for see attachments list
Last edited:


 Wrong section :/: