DMO Emulator

Status
Not open for further replies.
qiuck question can i change the port for the auth server or does it HAVE to be 7029?
also what ports are working for you guys for the servers?

EDIT another quick question did u have to change anything in the database as well?
 
Last edited:
FULL Tutorial on how to setup these server files -
VERY IMPORTANT NOTE: These files are INCOMPLETE. You won't be able to host a public server unless you know how to complete them.


Server files

There's two ways around this: You can use Shiro's source or use the pre-compiled files that have been shared.
The following tutorials were written assuming you've already got a MySQL database setup.

SQL File:

Source:

Files required -
Tortoise SVN -
Microsoft C# 2010 Express -
Microsoft .NET Framework 4.0
These .dll -


Steps - All the following steps should be done assuming you've got all the files mentioned above.

1 - Create a new folder wherever you wish, name this folder "DMO" (Or whatever you want to name it)
2- Right click the folder, choose "SVN Checkout" and paste the github link found on the first post of this thread.
3- After all files have been downloaded, open the folder you created, open the "trunk" folder and double click on the file named "Digital World", a Microsoft Visual Studio Solution file. (There will be some errors, ignore them, they're not important in order to get the server running.)
4- On the Solution Explorer window, click the "Yggdrasil" project, right click "References" and click "Add Reference".
5- Go on the "Browse tab" of the new window that has been opened and add all the .dll that have been supplied above and press OK.

- Warning: I'm not sure if you need to add somewhere else but I'm assuming no (I don't remember if I added or not). If you need help with this, just PM me. -

6- Press F6 to Build the Solution. If all went well, you've now compiled the files. You may find the .exe's on the "AuthServer\bin\Debug" | "Digital World\bin\Debug" | "Lobby Server\bin\Debug" folders. REMEMBER TO EDIT THE SETTINGS.XML FILE ON ALL FOLDERS.

Files - (Compiled by SunFlowers)

Required files -
The compiled source -

1- Extract the "DMO.a - Copia" folder into your desktop.
2- Edit settings.xml file (Detailed help will be given later on) with your database information


Client -

These files require the version 15 english client in order to run. The korean client remains untested.

FILES REQUIRED:
Version 6 client:
v7-15 patch:


1- Install/extract with winrar the client.
2- Extract every file from the DMO_patchwh.zip file and copy paste it, by order (7-15) into the folder you've installed/extract the client to.
3- Open notepad, type "GDMO.exe true" and save it, on the client's folder, as "play.bat"


Connecting to the server

Required:
General computer knowledge

Before starting -
Portfoward the ports 6999, 7000 and 7029. < This is a MUST if you wish to sucessfully connect to your server.

Files required -
Hosts File Manager (easier then editing the hosts file by yourself) -


We're assuming you're using a ROUTER, which I believe may be the case of everyone, since MODEMS are now discontinued.

- Preparing the database -

1 - Go on start menu, type "CMD" (if you're on Windows 7/VISTA) and type "ipconfig" on the MS-DOS window that follows up. Scroll up and look for your "IPv4" IP and note it down.
2- Go to , type in your IPv4 IP and copy the Integer IP that resulted from the Conversion.
3- Access your database (Navicat/PHPMyAdmin or whatever you're using), go on the DMO database, go on the "servers" table and delete all but ONE server.

The table will have the following format:

serverId | name | ip | port

You can add whatever serverId you want, whatever name you want. On the IP part, replace the numbers that are there for the Integer IP you obtained on STEP 2. Save your changes.

- Preparing the files -

This works for both compiled and pre-compiled versions of the tutorial. Remember, if you've compiled yourself the files and they are still on their original folders, you will need to change ALL settings.xml so they can all have the same information.


1- Open settings.xml

Between the host tags (<host> NUMBERS </host> ) replace NUMBERS with your IPv4 IP. Make sure that all AutoStart tags (<AutoStart> true </AutoStart> ) it's set to true, to avoid you having to manually start the server.

The hatch rates on this folder are easy to understand. Each Level ("<Level 1" "<Level 2") is refering to 1/5, 2/5, etc. The sum of Success, Failure and Broken must equal 1.
The size ranges are the same as the hatch rates, <level 3 equals a 3/5 digimon, <level 4 a 4/5 digimon, etc. You can set whatever minimum and max you want on the "min=number"/"max=number" part. (This is the percentage of the size, no the size of the digimon.)


- Preparing the hosts file -

1- Go on and copy your IP address.
2- Open up Hosts Manager (download file and information supplied above) and click "Edit Hosts".
3- Click "Add", and on the "Host name" part type "account.dmo.joymax.com" and on the IP part type in your IP from Step 1.
4- Press Save.


- Running the server -
1- Open AuthServer.exe , LobbyServer.exe and DigitalWorld.exe (in any order)
2- Go to your client folder, double click "Play.bat" and wait for HShield to update.
3- After reaching the login screen, type "admin" as your login username and "admin" as your password. On the character screen, DELETE a character (whatever character) and create your new one. This is important because whenever I tried to login with one of the characters there, my client crashed. Easy solution: delete them all.
4- If you're ingame, congratulations, you've sucessfully managed to setup the server.


Administrator commands:
(Thanks shiro for posting them)

Code:
Commands prefixed by ! characterList:
!inc - No clue what it does. Forgot. Maybe shows the current egg's level in incubator?
!item itemid [amount] - Adds max or [amount] of item.
!item itemid amount f1 f2 f3 f4 f5 f6 - Modifies item flags.
!sk1 position - Tests digimon skill packet.
!hatch - Tests incubator hatch msg.
!list - Show who's in the map
!force - Resends spawn other plays to self
!spawn - Test mob spawning.
!reload - Reloads map and resends char info.
!save - Save's self to DB
!ann [msg] - Show a megaphone message.
!map mapid - Warps to mapid.
!tele [dats]  - Warps to certain known areas. Only 1 available: DATS
!where - Displays current location
!merc mercid - Check if mercid is in the database
!mk mercid - Create mercid and add to digi archive.
!tamer.setav [option] [value] - Sets tamer's option to value    Supports following options: lv, at, de, hp, ds, fatigue, ms, tamer, archive, inv, storage, size, bits.
!digimon.setav [option] [value] - Sets current digimon's option to value.    Supports following options: min, max, default, lv, exp, hp, ds, at, ev, ht, cr, as, ms, sync, type, name, size, scale

And that's it. If you need any help, I'm sure anyone around here are delighted to help you. If you want to create your own account, search the last 6 pages for information on how to do it. I hope I've helped you guys. Good luck!


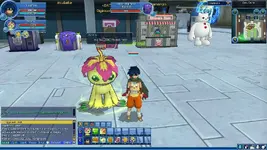
SOME SCREENSHOTS:
120810_041054 - DMO Emulator - RaGEZONE Forums 120810_041114 - DMO Emulator - RaGEZONE Forums 120810_041134 - DMO Emulator - RaGEZONE Forums 120810_041221 - DMO Emulator - RaGEZONE Forums 120810_041231 - DMO Emulator - RaGEZONE Forums
 
Last edited:
FULL Tutorial on how to setup these server files -
VERY IMPORTANT NOTE: These files are INCOMPLETE. You won't be able to host a public server unless you know how to complete them.


Server files

There's two ways around this: You can use Shiro's source or use the pre-compiled files that have been shared.
The following tutorials were written assuming you've already got a MySQL database setup.

SQL File:

Source:

Files required -
Tortoise SVN -
Microsoft C# 2010 Express -
Microsoft .NET Framework 4.0
These .dll -


Steps - All the following steps should be done assuming you've got all the files mentioned above.

1 - Create a new folder wherever you wish, name this folder "DMO" (Or whatever you want to name it)
2- Right click the folder, choose "SVN Checkout" and paste the github link found on the first post of this thread.
3- After all files have been downloaded, open the folder you created, open the "trunk" folder and double click on the file named "Digital World", a Microsoft Visual Studio Solution file. (There will be some errors, ignore them, they're not important in order to get the server running.)
4- On the Solution Explorer window, click the "Yggdrasil" project, right click "References" and click "Add Reference".
5- Go on the "Browse tab" of the new window that has been opened and add all the .dll that have been supplied above and press OK.

- Warning: I'm not sure if you need to add somewhere else but I'm assuming no (I don't remember if I added or not). If you need help with this, just PM me. -

6- Press F6 to Build the Solution. If all went well, you've now compiled the files. You may find the .exe's on the "AuthServer\bin\Debug" | "Digital World\bin\Debug" | "Lobby Server\bin\Debug" folders. REMEMBER TO EDIT THE SETTINGS.XML FILE ON ALL FOLDERS.

Files - (Compiled by SunFlowers)

Required files -
The compiled source -

1- Extract the "DMO.a - Copia" folder into your desktop.
2- Edit settings.xml file (Detailed help will be given later on) with your database information


Client -

These files require the version 15 english client in order to run. The korean client remains untested.

FILES REQUIRED:
Version 6 client:
v7-15 patch:


1- Install/extract with winrar the client.
2- Extract every file from the DMO_patchwh.zip file and copy paste it, by order (7-15) into the folder you've installed/extract the client to.
3- Open notepad, type "GDMO.exe true" and save it, on the client's folder, as "play.bat"


Connecting to the server

Required:
General computer knowledge

Before starting -
Portfoward the ports 6999, 7000 and 7029. < This is a MUST if you wish to sucessfully connect to your server.

Files required -
Hosts File Manager (easier then editing the hosts file by yourself) -


We're assuming you're using a ROUTER, which I believe may be the case of everyone, since MODEMS are now discontinued.

- Preparing the database -

1 - Go on start menu, type "CMD" (if you're on Windows 7/VISTA) and type "ipconfig" on the MS-DOS window that follows up. Scroll up and look for your "IPv4" IP and note it down.
2- Go to , type in your IPv4 IP and copy the Integer IP that resulted from the Conversion.
3- Access your database (Navicat/PHPMyAdmin or whatever you're using), go on the DMO database, go on the "servers" table and delete all but ONE server.

The table will have the following format:

serverId | name | ip | port

You can add whatever serverId you want, whatever name you want. On the IP part, replace the numbers that are there for the Integer IP you obtained on STEP 2. Save your changes.

- Preparing the files -

This works for both compiled and pre-compiled versions of the tutorial. Remember, if you've compiled yourself the files and they are still on their original folders, you will need to change ALL settings.xml so they can all have the same information.


1- Open settings.xml

Between the host tags (<host> NUMBERS </host> ) replace NUMBERS with your IPv4 IP. Make sure that all AutoStart tags (<AutoStart> true </AutoStart> ) it's set to true, to avoid you having to manually start the server.

The hatch rates on this folder are easy to understand. Each Level ("<Level 1" "<Level 2") is refering to 1/5, 2/5, etc. The sum of Success, Failure and Broken must equal 1.
The size ranges are the same as the hatch rates, <level 3 equals a 3/5 digimon, <level 4 a 4/5 digimon, etc. You can set whatever minimum and max you want on the "min=number"/"max=number" part. (This is the percentage of the size, no the size of the digimon.)


- Preparing the hosts file -

1- Go on and copy your IP address.
2- Open up Hosts Manager (download file and information supplied above) and click "Edit Hosts".
3- Click "Add", and on the "Host name" part type "account.dmo.joymax.com" and on the IP part type in your IP from Step 1.
4- Press Save.


- Running the server -
1- Open AuthServer.exe , LobbyServer.exe and DigitalWorld.exe (in any order)
2- Go to your client folder, double click "Play.bat" and wait for HShield to update.
3- After reaching the login screen, type "admin" as your login username and "admin" as your password. On the character screen, DELETE a character (whatever character) and create your new one. This is important because whenever I tried to login with one of the characters there, my client crashed. Easy solution: delete them all.
4- If you're ingame, congratulations, you've sucessfully managed to setup the server.


Administrator commands:
(Thanks shiro for posting them)

Code:
Commands prefixed by ! characterList:
!inc - No clue what it does. Forgot. Maybe shows the current egg's level in incubator?
!item itemid [amount] - Adds max or [amount] of item.
!item itemid amount f1 f2 f3 f4 f5 f6 - Modifies item flags.
!sk1 position - Tests digimon skill packet.
!hatch - Tests incubator hatch msg.
!list - Show who's in the map
!force - Resends spawn other plays to self
!spawn - Test mob spawning.
!reload - Reloads map and resends char info.
!save - Save's self to DB
!ann [msg] - Show a megaphone message.
!map mapid - Warps to mapid.
!tele [dats]  - Warps to certain known areas. Only 1 available: DATS
!where - Displays current location
!merc mercid - Check if mercid is in the database
!mk mercid - Create mercid and add to digi archive.
!tamer.setav [option] [value] - Sets tamer's option to value    Supports following options: lv, at, de, hp, ds, fatigue, ms, tamer, archive, inv, storage, size, bits.
!digimon.setav [option] [value] - Sets current digimon's option to value.    Supports following options: min, max, default, lv, exp, hp, ds, at, ev, ht, cr, as, ms, sync, type, name, size, scale

And that's it. If you need any help, I'm sure anyone around here are delighted to help you. If you want to create your own account, search the last 6 pages for information on how to do it. I hope I've helped you guys. Good luck!


SOME SCREENSHOTS:
View attachment 111120View attachment 111121View attachment 111122View attachment 111123View attachment 111124


do i portfoward with my router or my firewall?
 
View attachment 111128

did i do it correctly?
cause i dont think i did
and my firewall is disabled for now
Yes, it's correct. If you want to see if they're open, go on and try to ping the ports you've opened.


- Currently trying to get a readable item/digimon list for those who wish to use. Also, not sure if the !mk command is working correctly..
 
Yes, it's correct. If you want to see if they're open, go on and try to ping the ports you've opened.


- Currently trying to get a readable item/digimon list for those who wish to use. Also, not sure if the !mk command is working correctly..

try replacing the ! with /
it might work

EDIT all the ports are closed
i have a option to trigger the port in my router settings do i need to do that?
 
try replacing the ! with /
it might work

EDIT all the ports are closed
i have a option to trigger the port in my router settings do i need to do that?
Yeah, try it.

Last screenshot of the night:
120810_061027 - DMO Emulator - RaGEZONE Forums
yeah.. made a simple command so I can make our partners say whatever I want them to say ^^


Edit - Complete lists of Digimons, Maps, Items, Item ID, Digimon ID, NPCS. Item ID's has alot of blanks, I'll make a parser later to delete them so we can have only the ones that matter.
Download link:
 
Last edited:
Yeah, try it.

Last screenshot of the night:
View attachment 111129
yeah.. made a simple command so I can make our partners say whatever I want them to say ^^


Edit - Complete lists of Digimons, Maps, Items, Item ID, Digimon ID, NPCS. Item ID's has alot of blanks, I'll make a parser later to delete them so we can have only the ones that matter.
Download link:

thanks for the id lists

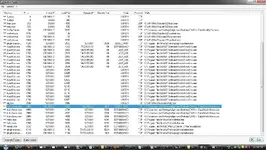
plus here is a rundown of all the ports the auth server is using
port - DMO Emulator - RaGEZONE Forums
 
Error in sql part:
you can't get a defaul scale size when you create another tamer/digimon

Fixed*
Design table and set it to vale 100 in column bit. and in char aprt sql set it to 31001 int
 
Now Guys I think You Can Create A Private Server !
So Pls Do It And Every Body Is Going To Be Happy !
After Creating A Private Server , Pls Post A Link For You Private Server Website And That's How We Can Download It !
And Pls Put The Link Of The Game Configured Wich We Have Only To Double Click On The Play File Then Have Fun !
Thank You !
 
Status
Not open for further replies.
Back